Cooking in progress...

Tag: Cooking Classes

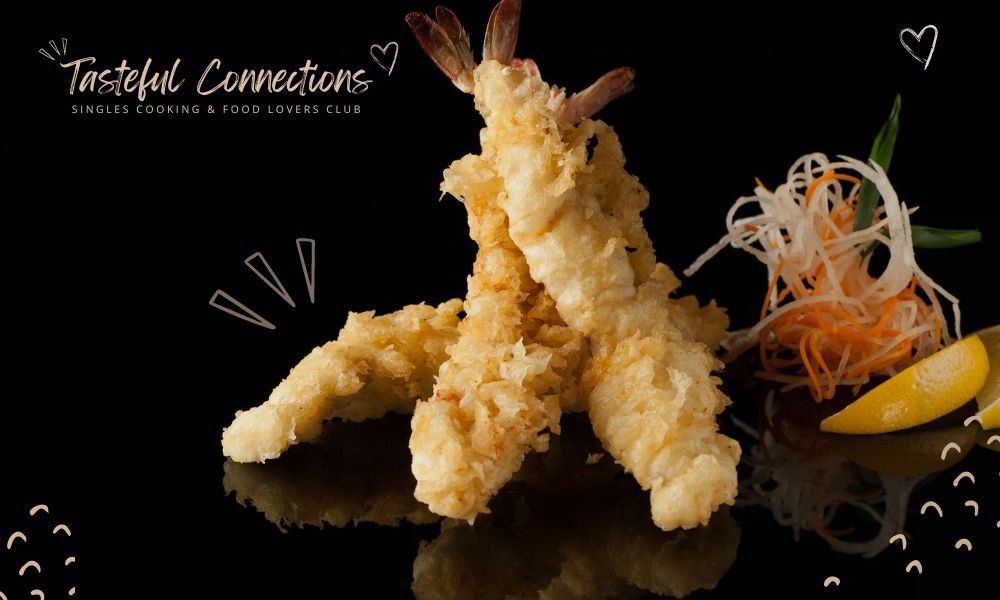
Light & Crispy Tempura Prawns Recipe for One

Tempura prawns are a delightful Japanese appetizer, celebrated for their light and crispy coating that perfectly complements the succulent texture of prawns. With just a few ingredients and a quick cooking time, this recipe lets you enjoy restaurant-quality tempura from the comfort of home. Ideal for a solo treat, these prawns are easy to prepare and offer a satisfying bite that’s both crunchy and tender.

“Who says tempura can’t be a one-person party? Crunchy prawns, no sharing required!”

A Tasteful Connections Quote – cheeky, yet tasteful.

Ingredients:

  • 6-8 medium prawns, peeled and deveined (leave tails on if desired)
  • 1/4 cup all-purpose flour (plus a bit extra for dusting prawns)
  • 1/4 cup cold sparkling water (or ice-cold water)
  • 1/2 tsp baking powder
  • Pinch of salt
  • Vegetable oil for frying

Optional for serving:

  • Soy sauce or tempura dipping sauce
  • Lemon wedges

Instructions:

  1. Prepare the Prawns:Pat the prawns dry with a paper towel.Lightly dust them with a small amount of flour to help the batter stick.
  2. Make the Tempura Batter: In a small bowl, combine the 1/4 cup of flour, baking powder, and salt. Slowly add the cold sparkling water, stirring gently with chopsticks or a fork. Be careful not to overmix; a few lumps are okay. This batter should be slightly thin but still coat the prawns. (Tip: Cold batter helps make the tempura extra crispy.)
  3. Heat the Oil: In a small saucepan, heat about 1 inch of vegetable oil over medium-high heat to around 350°F (180°C). (Test by dropping a little batter in—it should sizzle and float.)
  4. Fry the Prawns: Dip each prawn into the batter, ensuring it’s fully coated. Carefully place the battered prawns into the hot oil, frying 3-4 at a time to avoid crowding. Fry for about 1-2 minutes on each side, or until they turn golden and crispy. Remove prawns with a slotted spoon and drain on a paper towel.
  5. Serve: Arrange the tempura prawns on a plate and serve with soy sauce or tempura dipping sauce on the side. Add a lemon wedge for extra zest if desired.

Pair your tempura prawns with a refreshing drink to balance their subtle richness. For an alcoholic option, a chilled glass of light sake or a crisp white wine, such as Sauvignon Blanc, complements the tempura’s delicate flavors beautifully. If you prefer a non-alcoholic option, try pairing it with iced green tea or a zesty ginger ale for a refreshing, balanced finish.


Shakshuka with Eggs (Single Serving)

Shakshuka is the ultimate one-pan wonder—a perfect dish for when you’re cooking just for yourself and want something hearty, flavorful, and satisfying. This North African and Middle Eastern classic combines eggs poached in a rich, spiced tomato sauce, making it ideal for breakfast, lunch, or even a cozy dinner. With simple ingredients and a quick cooking process, you’ll have a wholesome, comforting meal in no time. Ready to dig into a warm bowl of shakshuka? Let’s get cooking!

“One pan, two eggs, and zero drama—because cooking for one never tasted so good!”

A Tasteful Connections Quote – cheeky, yet tasteful.

Ingredients:

  • 1 tablespoon olive oil
  • 1/4 onion, finely chopped
  • 1/2 bell pepper, chopped
  • 1 garlic clove, minced
  • 1/2 teaspoon cumin
  • 1/2 teaspoon paprika
  • 1/4 teaspoon chili flakes (optional, for heat)
  • 1 cup crushed tomatoes (or canned diced tomatoes)
  • Salt and pepper to taste
  • 2 eggs
  • Fresh parsley or cilantro, for garnish
  • Crusty bread, for serving

Instructions:

  1. Sauté Vegetables: Heat olive oil in a small pan over medium heat. Add the chopped onion and bell pepper, and sauté for about 5 minutes until softened.

  2. Add Spices: Stir in minced garlic, cumin, paprika, and chili flakes (if using). Cook for another minute until fragrant.

  3. Cook Tomatoes: Pour in the crushed tomatoes and season with salt and pepper. Simmer for 5-7 minutes, until the sauce thickens slightly.

  4. Poach the Eggs: Make two small wells in the tomato mixture and crack the eggs into each well. Cover the pan and let it cook for 5-7 minutes, or until the eggs are cooked to your preferred doneness.

  5. Garnish and Serve: Once done, garnish with fresh parsley or cilantro. Serve hot with crusty bread for dipping into the sauce and yolks.


Your shakshuka is now ready to enjoy, and the only thing left is to choose the perfect drink to accompany it. For a bright and refreshing pairing, opt for a glass of fresh orange juice, which adds a burst of citrus to complement the rich tomato flavors. If you’re looking for something cool and light, a minted iced tea provides a refreshing contrast to the warm spices of the dish. For an evening meal, a light red wine like Pinot Noir adds a subtle, fruity note without overwhelming the flavors. Whatever you choose, this shakshuka is sure to hit the spot and leave you feeling satisfied!

Vegetarian Paneer Biryani – Single or Date Night Recipe

Looking to impress with a dish that’s as vibrant and exciting as the conversation? This Vegetarian Paneer Biryani is the perfect choice for a cozy night in or a fun solo cooking adventure. With aromatic spices, tender paneer, and fragrant basmati rice, this dish brings a touch of elegance to your kitchen while keeping things easy and approachable. Whether you’re preparing it for yourself or someone special, the irresistible flavors will have you savoring every bite. So, tie on that apron, because things are about to get delicious. Let’s get cooking!

“Spice up your night – and maybe your love life – with a little Paneer Biryani magic!”

A Tasteful Connections Quote – cheeky, yet tasteful.

Ingredients:

  • 100g paneer – cut into cubes.
  • ½ cup basmati rice – soaked in water for 20 minutes.
  • 1 small onion – thinly sliced.
  • 1 small tomato – chopped.
  • 1 small potato – diced and boiled until tender.
  • 2 tablespoons plain yogurt.
  • 2 tablespoons vegetable oil or ghee.
  • 1 clove garlic – minced.
  • ½ inch ginger – grated.
  • 1 green chili – finely chopped (optional, for extra heat).
  • ½ teaspoon garam masala.
  • ½ teaspoon turmeric powder.
  • 1 teaspoon biryani masala (optional, available at most grocery stores or online).
  • ¼ teaspoon cumin seeds.
  • A pinch of saffron strands – soaked in 2 tablespoons of warm milk (optional but adds a rich aroma).
  • 1 bay leaf.
  • 2-3 cloves.
  • 2-3 cardamom pods.
  • 1 cinnamon stick.
  • Fresh coriander and mint leaves – chopped for garnish.
  • Salt to taste.

Instructions:

  1. Cook the Basmati Rice: In a pot, bring water to a boil with a pinch of salt. Add the soaked basmati rice, and cook until 70% done (the grains should still have a slight bite). Drain the rice and set aside.
  2. Fry the Paneer: Heat 1 tablespoon of oil or ghee in a pan. Add the paneer cubes and lightly fry until golden brown on all sides. Remove and set aside.
  3. Prepare the Biryani Base: In the same pan, add the remaining oil or ghee. Once hot, add cumin seeds, bay leaf, cloves, cardamom, and cinnamon stick. Let them crackle. Add the sliced onion and sauté until golden brown. Stir in minced garlic, ginger, and green chili, and cook for another 2 minutes. Add the chopped tomato and cook until soft, then mix in turmeric, garam masala, biryani masala, and a pinch of salt. Add the yogurt and stir to form a smooth gravy.
  4. Add Paneer and Vegetables: Add the fried paneer cubes and boiled potato to the gravy. Stir gently so the paneer absorbs the flavors. Cook for another 2-3 minutes.
  5. Layer the Biryani: In the same pan (or a separate small oven-safe dish if you’re baking), layer half of the cooked rice over the paneer mixture. Drizzle the saffron milk over the rice for color and aroma. Add the remaining rice as a final layer. Cover the pan with a lid, or use foil if baking.
  6. Dum Cooking (Steaming): If cooking on the stovetop, reduce the heat to low, cover, and let it steam for 10-15 minutes until the rice is fully cooked and flavors meld together. If baking, preheat the oven to 180°C (350°F) and bake for 15-20 minutes.
  7. Serve and Garnish: Once cooked, fluff the biryani gently with a fork. Garnish with fresh coriander and mint leaves. Serve hot with a side of raita or cucumber salad.Tip! For a romantic date night, serve the biryani in a beautiful dish with candles, and pair it with a cooling yogurt-based raita for contrast.

Now that your Paneer Biryani is ready, it’s time to elevate the experience with the perfect drink pairing. If you’re a wine lover, a slightly sweet Riesling or a crisp Chenin Blanc will complement the spices and richness of the dish, while a light-bodied Pinot Noir adds a delicate balance for those who prefer red. If you’d rather go non-alcoholic, a refreshing Mango Lassi provides a cooling contrast to the biryani’s warmth, or try an Iced Masala Chai for a spiced twist that mirrors the flavors of your meal. Whichever you choose, you’re in for a flavorful evening—enjoy!

Mexican Fajita Tacos Recipe for One

Craving bold flavors with minimal effort? These Mexican Fajita Tacos are a perfect solo indulgence, packing a punch with every bite. With sizzling seasoned veggies, tender strips of chicken or beef, and a tortilla that wraps it all up, you’ll have yourself a fiesta right at home!

Whether it’s Taco Tuesday or just a night to treat yourself, these tacos are the quick and easy win you need. Grab your pan, crank up the heat, and let’s get these fajitas sizzling! This meal comes together in minutes, and you’ll be chowing down in no time.

“Sizzling solo? These tacos are all the spice your night needs!”

A Tasteful Connections Quote – cheeky, yet tasteful.

Ingredients:

  • 1 small chicken breast (or 100g beef strips)
  • 1/2 red bell pepper, sliced
  • 1/2 green bell pepper, sliced
  • 1/2 onion, sliced
  • 1 tablespoon olive oil
  • 1 teaspoon fajita seasoning (or a mix of chili powder, cumin, paprika, garlic powder, and cayenne)
  • 1 tablespoon lime juice
  • 2 small flour tortillas
  • Salt and pepper to taste
  • Optional toppings: sour cream, guacamole, salsa, shredded cheese, cilantro

Instructions:

  1. Prep the Meat and Veggies: Slice the chicken breast (or beef) into thin strips, and slice the bell peppers and onion into thin strips.
  2. Season the Meat: In a small bowl, toss the chicken or beef strips with fajita seasoning, lime juice, salt, and pepper until evenly coated.
  3. Cook the Veggies: Heat 1/2 tablespoon of olive oil in a skillet over medium-high heat. Add the sliced onions and bell peppers, cooking for 5-6 minutes until they soften and begin to char slightly. Remove from the skillet and set aside.
  4. Cook the Meat: In the same skillet, heat the remaining olive oil and add the seasoned chicken (or beef) strips. Cook for 4-5 minutes (chicken) or 3-4 minutes (beef) until the meat is cooked through and slightly charred.
  5. Assemble the Tacos: Warm the tortillas in a pan or microwave for a few seconds. Layer the cooked meat and veggies onto the tortillas. Add your favorite toppings like sour cream, guacamole, salsa, cheese, or cilantro.
  6. Serve: Fold the tortillas and enjoy your delicious fajita tacos for one!

For the perfect pairing, a classic margarita with a salted rim is your go-to. Prefer something lighter? Try a refreshing Mexican beer like Corona or Modelo—because nothing beats a cold drink with tacos in hand!

Creamy Garlic Prawns with Tagliatelle

Looking to impress your date with a dish that’s equal parts indulgent and elegant? This Creamy Garlic Prawns with Tagliatelle recipe is sure to sweep them off their feet—one bite at a time. With tender prawns, silky pasta, and a rich garlic-infused cream sauce, it’s the perfect balance of sophistication and comfort. Plus, it’s quick enough to keep you out of the kitchen and back at the table, enjoying the evening together.

“Why dine out when you can prawns and chill at home?”

A Tasteful Connections Quote – cheeky, yet tasteful.

Ready to impress? With just a few simple steps, you’ll be serving up a restaurant-worthy meal that’ll have your date swooning. So, grab your apron, set the mood, and let’s get cooking—because this dish is about to steal the show!

Ingredients:

  • 200g tagliatelle pasta
  • 200g large prawns, peeled and deveined
  • 2 tablespoons olive oil
  • 3 cloves garlic, minced
  • 1/2 cup dry white wine (optional)
  • 1/2 cup heavy cream
  • 1/4 cup grated Parmesan cheese
  • 1 tablespoon butter
  • Juice of half a lemon
  • Fresh parsley, chopped (for garnish)
  • Salt and pepper to taste
  • Red chili flakes (optional, for a kick)

Instructions:

  1. Cook the Pasta:
    Bring a large pot of salted water to a boil and cook the tagliatelle according to the package instructions until al dente. Drain and set aside, reserving a little pasta water.
  2. Sauté the Prawns:
    Heat 1 tablespoon of olive oil in a large pan over medium heat. Season the prawns with salt and pepper. Add the prawns to the pan and cook for 2-3 minutes per side until they’re pink and cooked through. Remove and set aside.
  3. Make the Garlic Cream Sauce:
    In the same pan, add the remaining tablespoon of olive oil and butter. Sauté the minced garlic for about 1 minute until fragrant (don’t let it burn). Add the white wine (if using) and let it reduce for 2-3 minutes.
  4. Add Cream and Parmesan:
    Lower the heat and stir in the heavy cream. Let it simmer gently for 2 minutes, then stir in the Parmesan cheese until melted and the sauce thickens slightly. Squeeze in the lemon juice and season with salt, pepper, and red chili flakes (if using).
  5. Combine Pasta and Prawns:
    Toss the cooked tagliatelle into the sauce, adding a splash of reserved pasta water if needed to loosen the sauce. Gently fold in the cooked prawns.
  6. Serve:
    Divide the pasta between two plates, garnish with freshly chopped parsley, and a little extra Parmesan if you like. Serve with a chilled glass of white wine to impress your date!

This creamy, garlicky prawn and pasta dish is rich, flavorful, and bound to make your date night a hit!

Now that you’ve created a meal to remember, all that’s left is to pair it with the perfect wine. A chilled Sauvignon Blanc or Pinot Grigio will beautifully complement the rich, creamy sauce and delicate prawns, adding a crisp and refreshing touch to your dinner.

So, pour a glass, sit back, and enjoy the compliments—because this dish (and the company) is sure to be unforgettable! Cheers!

How To Cook A Tender Juicy Steak

Craving a perfectly juicy, mouth-watering steak that’s packed with flavor and cooked to perfection? Look no further! This simple yet decadent pan-seared steak recipe, finished with rich garlic butter, will help you achieve that ideal restaurant-quality steak at home. Whether you like it medium-rare or well-done, this recipe ensures a tender, flavorful steak with a golden crust and buttery finish every time. Ready to treat yourself to a steakhouse experience in your own kitchen? Let’s get cooking!

Why settle for medium when you can have well-done… just like this steak and my solo life!”

A Tasteful Connections Quote – cheeky, yet tasteful.

Whether you’re cooking for one or just treating yourself to a little luxury, this juicy, pan-seared steak will hit all the right notes. With a golden, buttery crust and tender, melt-in-your-mouth center, it’s a simple yet satisfying dish that makes being single taste even better. So, grab your skillet, fire up the stove, and let’s get cooking—you deserve this!

Ingredients:

  • 1 steak (ribeye, sirloin, or filet mignon, about 1 inch thick)
  • 1 tablespoon olive oil
  • 2 tablespoons butter
  • 2 cloves garlic, smashed
  • Fresh rosemary or thyme sprigs (optional)
  • Salt and pepper to taste

Instructions:

  1. Prep the Steak: Take the steak out of the fridge 30 minutes before cooking to bring it to room temperature. Pat it dry with paper towels, then season generously with salt and pepper on both sides.
  2. Heat the Pan: Heat a cast-iron skillet or heavy pan over high heat until very hot (about 3-5 minutes). Add the olive oil.
  3. Sear the Steak: Place the steak in the hot pan and let it sear without moving for about 2-3 minutes, or until a nice brown crust forms. Flip the steak and sear the other side for another 2-3 minutes.
  4. Baste with Garlic Butter: Reduce the heat to medium. Add butter, garlic, and rosemary or thyme (if using) to the pan. Tilt the pan slightly and use a spoon to baste the steak with the melted butter and garlic mixture. Continue basting for 1-2 minutes.
  5. Check Doneness: Use a meat thermometer to check for your preferred doneness: Medium-rare: 54°C (130°F); Medium: 60°C (140°F); Well-done: 71°C (160°F);
  6. Rest the Steak: Remove the steak from the pan and let it rest on a plate for 5 minutes to allow the juices to redistribute.
  7. Serve: Slice the steak against the grain and drizzle with the garlic butter from the pan.

Enjoy your perfectly juicy steak!

Now that you’ve mastered the art of a juicy steak, why not elevate your meal with the perfect sides? Pair it with garlic mashed potatoes, roasted asparagus, or a fresh arugula salad for a balanced, flavorful feast. And no steak dinner is complete without a great wine—try a bold red like a Cabernet Sauvignon or a Malbec to complement the rich, savory flavors of your steak.

Whether it’s a cozy night in or just because you deserve it, this meal is sure to be a winner. Bon appétit!